Dry Basement: ACCL Waterproofing
WHY IS IT SO IMPORTANT TO KEEP YOUR BASEMENT DRY THIS WINTER?
Winterizing our homes, from storm windows to roof repair, takes a lot of time. What about the basement, though? Our basements, as well as the foundations of our houses, require attention.
When it comes to wreaking havoc on our homes, winter is the worst. That alone is reason enough to ensure that your home is well-protected during the winter months.
WHY IS IT SO IMPORTANT TO KEEP YOUR BASEMENT DRY DURING THE WINTER?
During the winter months, there is greater indoor activity, even in our basements. It’s crucial to keep it dry whether it’s totally finished or being used for storage.
MOLD AND MILDEW
Mold and mildew can grow quickly in the absence of sunlight and heat. They can grow to be quite large before you even realize it. It can begin to emit a foul stench and penetrate objects such as carpets, clothing, and furniture.
The odour and mold can be deadly, and it’s nearly impossible to get rid of them. Mold will be kept at bay in your basement if you keep it warm and dry. It can ruin your furniture and clothing to the point that you’ll have to toss them away.
LEAKS
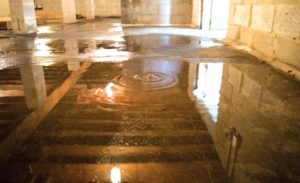
Leaks may be discovered in many areas of your basement. Groundwater, melted snow, rainfall from the eaves, or even a busted pipe can wreak havoc on a foundation with weak places.
During the colder months, the temperature can swing dramatically, causing large amounts of water to flow and subsequently freeze. The sun’s heat can melt ice or snow, causing it to run into the basement, even on a cold day.
If the leaks get severe enough, they can cause damage to flooring, carpets, and the electrical system, resulting in electric shock, power outages, and appliance damage.
CRACKS
Your foundation will always have minor flaws in it. They can be found on the walls, ceilings, doors and windows, and stairwells. Small cracks that are left to their own devices aren’t a big deal.
In the winter, however, due to the changing temperature, water might accumulate in the cracks, thaw, freeze, and then melt again. Because ice takes up more area than water, it will require additional space to expand. These ice fissures can lead to much more serious issues.
THE FOUNDATION IS WEAKENED
When water or moisture seeps into the concrete’s cracks, gaps, and pockets, it can lead to worse difficulties and holes. There can be a lot of damage caused by water freezing and melting, as well as water flowing around in cracks and around the foundation’s base.
It’s possible that shifting will occur if the foundation is destroyed. Damaged or broken door and window frames, slanted floors, and even a wall breaking or collapsing are all possibilities.
THINKING ABOUT WATERPROOFING YOUR BASEMENT?
A few leaks or cracks might quickly add up. If you have dampness or water damage, get it cleaned as soon as possible. The best approach to keep your basement dry is to have it waterproofed by a professional.
Take advantage of the winter months to have us look at your basement and help you determine how best to address your basement leakage problems.

Get the job done RIGHT – Hire a professional Waterproofing company!
Want to know more about our waterproofing process? Give us a call at 416-759-2995
Rely On our ACCL Wet Basement Waterproofing Experts
Don’t Drown in a wet basement!
Rely On Wet Basement Waterproofing Experts
If you’ve noticed foundation cracks, spots, water, mold, and mildew, don’t ignore the signs or it could lead to more damage and possible health effects.
The basement waterproofing specialists at ACCL Waterproofing know how to repair your basement and foundation walls and keep moisture out of your basement. We would be pleased to develop a guaranteed solution to keep your basement dry!
Crawl Space Waterproofing – ACCL Waterproofing
Crawl Space Waterproofing – ACCL Waterproofing
You may not give your crawl space much thought, but it is a vital structural element that lifts your house off the ground to help prevent flooding and pest infestations. Crawl spaces, unlike slab foundations, allow for the installation of wiring, plumbing, and ducting for simple access at a fraction of the expense of a basement. You can also use the crawl space to store objects that aren’t used often.
There is one drawback to crawl spaces: they, like basements, are prone to moisture problems. Because the crawl room is below the main living area, you may believe that water incursion is unimportant. This, however, is incorrect. Learn why you need to waterproof your crawl space and what options you have for keeping moisture out.
WATERPROOFING OF CRAWL SPACE BENEFITS
For a variety of reasons, homeowners are urged to waterproof their crawl spaces.
TEMPERATURE MANAGEMENT
The temperature in the rest of your house is affected by high humidity in the crawl area, making it feel colder or hotter than it should be. To keep comfortable, you may have to turn on the heater or air conditioner more frequently.
Because a waterproofed crawl space is cold and dry, it has less of an impact on home comfort. As a result, you save money on energy by lowering the length of time your HVAC system is running.
IMPROVING THE QUALITY OF INDOOR AIR
Up to 50% of the air in a crawl space can escape and enter the dwelling room. If the air is wet, moldy, and fumy, it will certainly affect the quality of your indoor air. As a result of overexposure to moldy air, sensitive people may experience headaches, respiratory distress, and allergy symptoms.
Mold growth is slowed when your crawl space is clean and dry. This keeps hazardous spores out of your family’s lungs, making breathing simpler for everyone.
PROTECT THE STRUCTURAL INTEGRITY OF YOUR HOME
Excess moisture can cause wood to decay, metal to rust, and drywall to be damaged. Mold and termites thrive in this type of climate, which can eat away at your home’s structure. Your floor joists may decay to dangerous levels if left unattended, resulting in exorbitant repair costs.
The addition of a vapour barrier to the crawl space keeps moisture out. This provides you with the assurance that your home is safe from the ravages of wood rot, mold, and termite infestation.
ELECTRICAL HAZARDS MUST BE REDUCED
Moisture and electricity are incompatible. Water problems could result in electrical shorts, rusty wires, or even a house fire if you have wiring running through your crawl space.
Maintaining the safety of your family requires ensuring that your electrical system is clear of dampness. Consider waterproofing the crawl space if you find difficulties with your wiring. This will reduce the chance of electrocution and fire.
PLUMBING AND DUCTWORK SHOULD BE PRESERVED
Water pipes, sewer lines, and air ducts are almost certainly running through your crawl area. This location makes them simple to maintain and repair, although rust can develop if the humidity is too high. Corrosion can cause pipes to break or ducting to deteriorate over time.
With crawl space waterproofing, you can extend the life of your plumbing and air duct systems.
MAINTAIN THE VALUE AND INSURABILITY OF YOUR HOME
Mold growth, structural damage, poor air quality, and comfort difficulties are all problems linked with excess moisture in the crawl space that might hinder your ability to sell your home in the future. Even if you don’t plan to move, having a damp crawl area can make homeowners insurance more difficult to obtain.
A vapour barrier in the crawl space may not raise property value immediately, but it may prevent problems from arising that could be detrimental. In this sense, crawl space waterproofing is an excellent investment that pays off handsomely.
SIGNIFICANCE OF WATERPROOFING FOR CRAWL SPACE
Early detection of moisture problems offers you the opportunity to address the problem before irreversible harm occurs. Unfortunately, because the crawl space is one of the least visited regions in your home, the vast majority of water leaks go unreported for a long time.
Plan to inspect your crawl space twice a year, once in the spring and once in the fall, to ensure you identify leaks early. When you do, keep an eye out for the following symptoms that your crawl space needs waterproofing:
- Water that isn’t moving
- a musty smell
- Mold and mildew development
- An infestation of insects or rodents
- Pipes or ductwork that are rusted
- Wood that has rotted
- The walls of the crawl space have white deposits on them.
- Your home’s exterior paint is peeling.
- Throughout the house, there are issues with air quality.
WATERPROOFING METHODS FOR CRAWL SPACE
The type of foundation you have, where the water is coming from, if you have a storm drain near your property, and the grade of the soil around the foundation all influence the strategies utilised to waterproof a crawl space.
The key to waterproofing your crawl area is to use a vapour barrier that is both waterproof and condensation-proof. This keeps moisture from evaporating and entering the crawl space in the soil beneath and around your home’s foundation. A vapour barrier is a heavy-duty polyethylene sheet that has been particularly constructed to deflect water rather than absorb it.
Waterproofing techniques can be used on the outside of your house or inside the crawl area.
WATERPROOFING ON THE OUTSIDE
Because excavation is required to waterproof a crawl space from the outside, this method is seen as time-consuming. Exterior waterproofing is best done at the initial construction phase or in conjunction with another renovation, repair, or landscaping job.
To keep water out, exterior waterproofing entails putting a moisture barrier around the foundation walls. A drainage system is frequently constructed to help alleviate hydrostatic pressure on the walls, which can lead to the formation of fractures over time.
WATERPROOFING IN THE INTERIOR
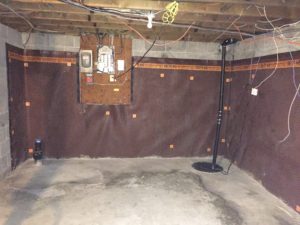
Interior waterproofing is typically just as effective as external waterproofing and requires less disruption. Installing a vapour barrier on the dirt floor, partway or all the way up the walls, and occasionally even the ceiling is the first step. Crawl space encapsulation is a method of keeping all outside moisture out of the crawl area.
After that, further methods such as a sump pump, dehumidifier, ventilator, or gravity discharge system may be utilized to drain water and dry off any remaining moisture in the crawl space. Combining internal waterproofing systems may be the most effective method.
Take advantage of the winter months to have us look at your basement and help you determine how best to address your basement leakage problems.
Get the job done RIGHT – Hire a professional Waterproofing company!
Want to know more about our waterproofing process? Give us a call at 416-759-2995
Rely On our ACCL Wet Basement Waterproofing Experts
Don’t Drown in a wet basement!
Rely On Wet Basement Waterproofing Experts
If you’ve noticed foundation cracks, spots, water, mold, and mildew, don’t ignore the signs or it could lead to more damage and possible health effects.
The basement waterproofing specialists at ACCL Waterproofing know how to repair your basement and foundation walls and keep moisture out of your basement. We would be pleased to develop a guaranteed solution to keep your basement dry!
Rod Leaks: ACCL Waterproofing
Rod Leaks: ACCL Waterproofing
If water gets into your basement, it can cause irreversible damage and render the space useless. Tie rod leaks, which are small holes in your foundations that can let water in, are one of the easiest problems to repair but also a very common port of entry for leaky basements.
With our entire selection of professional solutions, Direct Waterproofing can help you cure any and all basement and foundation damp problems.
Tie rods are short steel rods used to hold forms together during the construction of your home so that concrete can be poured. When the concrete is poured, the rods are removed, leaving weak points of entry where water can eventually make its way into your home.
What Should You Be Aware Of?
Most homes are built with tie rods, however some more modern homes employ snap ties, which do not have the same issue. If your home’s foundations have holes caused by tie rods, it’s usually a good idea to get them repaired, especially if water damage begins to appear.
If your tie rod holes are leaking, you may notice a little stain on the inside of your basement walls the size of a dime, or a water line that runs all the way down to the floor. Water can pool or flood your basement if the leak is significant. A wall normally has between 5 and 8 tie rods, and it will be the external walls that you are concerned with. As a result, water damage may emerge in orderly lines where the tie rods used to be.
What Causes This to Happen?
Small metal rods called tie rods are put into the concrete form during the initial building of many homes to hold the inner and outer forms together and give the structure with which the concrete can be poured. They are spaced around 18 inches apart, occasionally in two rows.
They are normally removed fully after construction, leaving a hole. The builders may attempt to hide the tie rod holes with hydraulic cement and a coating, at least visually, but this might wear off over time, revealing a particularly vulnerable spot for water to enter. Given that the tie rod holes are essentially hollow all the way through, water will always seek the path of least resistance and flow through them if possible. This is why the issue is so widespread. If water gets through, it will inevitably end up in your basement!
What Options Do You Have?
In the event of tie rod hole leaks, Direct Waterproofing has a variety of options available, and we can handle a single leaking tie hole or a whole wall of them. The job is usually simple and inexpensive, and it entails the careful administration of a high-grade sealant injection, also known as a swell plug, to fill and cement the hole.
If there are more serious problems, we can look into providing permanent interior or exterior waterproofing solutions to ensure that water never gets into your basement again.
What are Tie Rod Holes, and what do they do?
Tie rod holes are typically drilled into a foundation wall. The concrete foundation is reinforced with smooth steel rods. The rods keep the concrete forms from bulging under the weight of wet concrete. The tie rods are inserted between the concrete forms. Even under the great pressure of the wet concrete filling the forms to produce foundation walls, the concrete forms do not expand outward with the rods in place. The wet concrete pours over and around the tie rods as it is poured. The builders remove the tie rods once the concrete cures, leaving tiny holes known as tie rod holes.
Contractors usually fill the tie rod holes with hydraulic cement or another suitable material after removing the tie rods. Freeze-thaw cycles and ground movement, on the other hand, may cause the patching work to wear out over time. When groundwater seeps into the basement through the gaps in the foundation walls, this could cause problems. The tie rod holes have no bearing on your building’s overall strength and stability. They may, however, result in leaks in the basement and foundations.
Tie rod openings are very common in older homes. If you discover water stains or tiny holes where water is pouring or seeping through, you should act quickly. A leaking water line to the floor is another common sign. Water may pool in the basement or even create floods in extreme circumstances. Professional tie rod hole repair is recommended. To avoid the problem reoccurring, get the holes repaired by a skilled and reliable waterproofing contractor.
Take advantage of the warmer summer months to have us look at your basement and help you determine how best to address your basement leakage problems.
Get the job done RIGHT – Hire a professional Waterproofing company!
Want to know more about our waterproofing process? Give us a call at 416-759-2995
Rely On our ACCL Wet Basement Waterproofing Experts
Don’t Drown in a wet basement!
Rely On Wet Basement Waterproofing Experts
If you’ve noticed foundation cracks, spots, water, mold, and mildew, don’t ignore the signs or it could lead to more damage and possible health effects.
The basement waterproofing specialists at ACCL Waterproofing know how to repair your basement and foundation walls and keep moisture out of your basement. We would be pleased to develop a guaranteed solution to keep your basement dry!
ACCL Waterproofing: Installing Drainage Systems!
How to Waterproof a Basement and Install a Basement Drainage System – The ACCL Way!
Is your basement constantly wet? Do April showers bring May flowers and a flooded basement? Then waterproofing your basement and installing a drain system with a sump pump may be necessary. A wet basement not only prohibits you from using extra space in your home, but it can also turn your basement into a large petri dish ideal for the growth of harmful molds and fungi.
10 STEPS!
ACCL Waterproofing Step One:
It’s impossible to avoid the fact that breaking up concrete is a filthy task. While you’re working, switch off your furnace or central air conditioning and block all return air vents until you’re finished. Move everything out of the area and drape plastic from the ceiling to create an isolated workstation instead of covering it with plastic.
If you have an unfinished ceiling, make sure the plastic reaches all of the joist spaces. While using the jackhammer, place a fan in the window to help with the heavy dust. Also, put on a dust mask and earplugs. More measures to secure your house during remodeling efforts can be found here.
ACCL Waterproofing Step Two:
Electric jackhammers are preferred by professionals since pneumatic jackhammers generate significantly more dust. To begin, hammer a line 16 to 18 inches away from the wall. Begin by chipping in a straight line along the length of the wall, then return to break it down into manageable chunks. Return once the perimeter has been completed to break the concrete row into manageable fragments. If each component has enough freedom to pull away, it will break free more easily, so remove the sections as you go. Remember to make a larger area for your sump basin!
ACCL Waterproofing Step Three:
Dig down to the bottom of the footing but not below it once the concrete has been removed. You could wind up with cracks in your wall or worse if you jeopardize the soil beneath the footing. Use rubber feed buckets (usually used for farm animals) since they fit through narrow basement windows and are less likely to damage trim.
ACCL Waterproofing Step Four:
It’s ideal to put your basin in an unfinished basement area so you can get to the sump pump quickly. If you don’t intend to complete the basement, put the basin where you want the water to drain out of the house so you don’t have to install as much plastic tubing.
Dig the hole until the point where the top of the basin is flush with the finished concrete. Drill 1-inch holes in each block core and each mortar joint if your waterproofing basement walls are composed of concrete block. The water that collects in the cores and between the blocks will now be able to flow into the drain. Drill the holes as close as possible to the footings. It’s possible that the lower bricks are concrete-filled. You’ll have to demolish any existing walls and install foundation wrap in that instance. As you drill, place a shop vacuum hose close to the hole to reduce dust.
ACCL Waterproofing Step Five:
Place the basin in its final position before marking the locations of the holes where the pipes will meet the basin. Keep in mind that towards the basin, there will be a thin layer of rock (one layer thick) under the pipe. Use a reciprocating saw, jigsaw, or hole saw to make the holes. It is not necessary for the holes to be flawless. Don’t remove all of the dirt at once; some will be needed to fill in around the basin. Fill in around it once it’s permanently in place, tamping the ground with a 2×4 as you go.
ACCL Waterproofing Step Six:
Shovel in a bottom layer of 1-1/2-in. to 2-in. cleaned river rock before laying the pipe in the trench (a layer of smaller rock can become clogged with minerals and sediments). Every 10 feet, the pipe should slope at least 1/4 inch toward the basin. To get this pitch, rake the rock around. On top of the boulder, place your irrigation pipe. Because regular flexible drainpipe clogs easily, don’t use it. Schedule 10 perforated pipe with a 4-inch diameter is preferred.
Purchase a pipe with 1/2-inch rows. Only one side of the pipe has perforation holes, not all the way around. Install the pipe with the openings pointing down so that the minerals and sediment in the water can flow down and settle into the earth. The water that does rise up into the pipes from below will be reasonably clean as a result. Clean water will extend the life of the entire system by several years. Begin at the basin and push the male end of the pipe about 4 inches into the basin. At the corners, use PVC or ABS elbows. Cementing the parts together isn’t required.
ACCL Waterproofing Step Seven:
Drill a 1-inch hole in the core of each block and each mortar junction. After you’ve installed your pipe, you’ll need to connect it to the 1-inch irrigation hose that will bring the water from the blocks to the trench. Stick with irrigation hose because a softer hose, such as a garden hose, can be crushed flat by the new concrete. With a hacksaw or reciprocating saw, cut the hose. Make sure each hose portion is several inches past the footing.
ACCL Waterproofing Step Eight:
If your walls are made of poured concrete rather than block, you’ll need to build a foundation wrap to allow water to drain properly. The foundation wrap is constructed of durable plastic and has rows of dimples that allow water to pass through. With a utility knife, cut the sheets into strips. Allow the bottom half of the strips to run past the footing by bending them at 90 degrees. The length of the wrap against the wall is determined by your circumstances. Run the wrap up 4 in. above the top of the concrete on a poured wall, or up 4 in. past the holes you drilled in the block wall, at the very least. Try to tuck the wrap below the bottom plate if you’re working along stud walls.
ACCL Waterproofing Step Nine:
It’s time to cover it up after the hoses or foundation wrap are in place. Fill the trench with river rock up to the existing slab’s bottom, then cover the rock with a vapour barrier of at least a 6-mil thickness of plastic. Mix your concrete outside to reduce dust. For slabs and sidewalks, a bagged concrete mix will suffice. To “screed” the fresh concrete flush with the floor, slide a 3-foot strip of 2×4 along the floor and smooth it out with a hand float. After 20 minutes, use a finishing trowel to level it out. Fill the gap beneath any existing walls entirely with the float.
ACCL Waterproofing Step Ten:
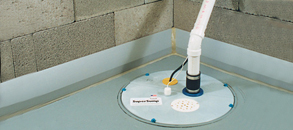
Submersible pumps with a vertical float switch are more reliable than pedestal or float switch pumps, according to professionals. On the pump, install a 6- to 8-in. segment of pipe, followed by a check valve. Ensure that the check valve does not obstruct the pump switch. Attach another segment of pipe above the check valve, long enough to reach above the top of the basin. In the portion of pipe just below the check valve, drill a 1/4-in. to 3/8-in. vapour lock release hole.
This permits the pump to come up to speed before attempting to force open the check valve, which may be under pressure from many gallons of water. While the pump is running, angle the hole so that water pours down. It’s preferable if your pump has its own output. Other appliances connected to the same circuit may trip a breaker if extension cords go unplugged. The pipe exiting the basement must be placed in a sloped area away from the house.
Consider burying the waste pipe in the trench and having it come back up where you want it if it involves running a pipe back across the basement. If you reside in a cold environment and your pipe will discharge above ground, run it no more than 8 inches past the siding. In the winter, this will keep it from freezing. Basement drain water, with a few exceptions, cannot be put into city sewer systems.
Most systems can be emptied into storm sewers if they are above ground level. Inquire with your building official about the rules in your region.
Take advantage of the warmer summer months to have us look at your basement and help you determine how best to address your basement leakage problems.
Get the job done RIGHT – Hire a professional Waterproofing company!
Want to know more about our waterproofing process? Give us a call at 416-759-2995
Rely On our ACCL Wet Basement Waterproofing Experts
Don’t Drown in a wet basement!
Rely On Wet Basement Waterproofing Experts
If you’ve noticed foundation cracks, spots, water, mold, and mildew, don’t ignore the signs or it could lead to more damage and possible health effects.
The basement waterproofing specialists at ACCL Waterproofing know how to repair your basement and foundation walls and keep moisture out of your basement. We would be pleased to develop a guaranteed solution to keep your basement dry!
What to Do If Your Window Well Is Filling Up With Water: ACCL Waterproofing
What to Do If Your Window Well Is Filling Up With Water
It’s wonderful to have windows in the basement. They let in natural light, can be opened to let in some much-needed fresh air, and can be used as an emergency exit when correctly configured. Of course, unless the homeowner prefers a close-up view of dirt, there must be window wells outside when there are windows in the basement. A window well allows for plenty of light and air while also acting as a stiff barrier to keep soil out.
A basement window, on the other hand, creates another gap in a foundation wall through which water can enter the basement. A well installed and maintained window will keep minor seepage out of the basement and is an important aspect of keeping it dry.
A considerable impact is also played by the window well. A window well, for all its charms, is nothing more than a large aperture in the ground adjacent to a foundation that, like any other large opening in the ground, has the potential to fill with water after a strong or prolonged rain or snow melt.
When a window well fills with water, it puts the basement window to the test by putting pressure on it and retaining water that seeks out any small opening to relieve the pressure by entering the basement space.
So, what’s the best technique to repair a water-filled window well?
How to Repair a Water-Filling Window Well
The drain and the lid are the two components of the window well system that must be repaired (or prevented) if the window well fills with water.
Window Well Drain
Every window well should have a drain to allow water to depart the well and not build up to the point where it causes a seepage problem in the basement. Drains can be connected to drain tile on the inside or outside, or they can be run to daylight if there is an appropriate slope.
A window well should never fill with water if the drain is properly installed and maintained. Of course, some home builders will skip the drains and install window wells without them. However, more often than not, the drains are present but clogged due to a lack of maintenance.
Finding and unclogging the drain is one approach to fix a window well that is filling with water. Cleaning material from the drain’s opening is normally simple, but unclogging a drain that has grown clogged below the surface can be tough. Of course, the ideal approach to deal with a clogged window well drain is to avoid it in the first place by installing a good window well cover.
Window Well Covers
The most significant function of a window well cover is to keep out the debris that can block the drain, such as leaves, grass clippings, and trash. Many people make the understandable error of thinking that fragile plastic “bubble” coverings from the hardware store will keep water out.
A steel grid cover is better, but it still allows a lot of debris to pass through.
The ideal window well cover will be made of reinforced polycarbonate and custom-fitted to the window well so that it completely covers it. While this style of cover will prevent most water from entering, it will also keep out debris (and small animals) and keep the window well drain open and operational.
These window well covers, of course, aren’t available at your local big box shop; instead, the homeowner will require the help of a basement waterproofing expert who has experience fabricating and installing polycarbonate coverings.
Take advantage of the warmer summer months to have us look at your basement and help you determine how best to address your basement leakage problems.
![]()
Get the job done RIGHT – Hire a professional Waterproofing company!
Want to know more about our waterproofing process? Give us a call at 416-759-2995
Rely On our ACCL Wet Basement Waterproofing Experts
Don’t Drown in a wet basement!
Rely On Wet Basement Waterproofing Experts
If you’ve noticed foundation cracks, spots, water, mold, and mildew, don’t ignore the signs or it could lead to more damage and possible health effects.
The basement waterproofing specialists at ACCL Waterproofing know how to repair your basement and foundation walls and keep moisture out of your basement. We would be pleased to develop a guaranteed solution to keep your basement dry!
There are eight reasons why sump pumps fail – ACCL Waterproofing
Sump Pump Failures
A sump pump, like a first aid box, a fire extinguisher, or your home’s security system, is rarely used, but it can be an invaluable tool in an emergency. Sump pumps aid in the mitigation and prevention of such disasters by immediately emptying flood water from a home’s basement through an external output pipe. And, like most emergency equipment, it’s critical to keep your sump pump in good working order and free of mechanical issues. If you don’t, you could end up with a flooded basement and thousands of dollars in damage. We hope that by identifying the eight causes of sump pump failure when it is most required, you will be able to avoid these possible issues.
Power Outage:
Storms and power outages frequently coincide to create a lethal combination that results in flooded basements around the country. This is owing to the fact that big rainstorms result in excess water, and a power outage renders your sump pump incapable of draining water. Fortunately, you may avoid this problem by purchasing and installing a backup generator for your sump pump. If you lose power during a storm, you can manually turn on this generator to prevent flooding in your basement.
Faulty Switches:
A jammed switch is the most typical mechanical issue that leads to sump pump failure. The float that activates the switch becomes ineffective when the pump shifts inside the basin, forcing it to lodge against the side of the pump, rendering it ineffective. It’s also possible that debris will clog the float, rendering it ineffective. Both of these issues may usually be resolved with some cleaning and repositioning of your sump pump within the basin.
Pump is Overworked:
If your sump pump isn’t the proper size or can’t handle the appropriate horsepower, it can easily be overwhelmed by a flow of water. A sump pump that is too large will overwork and have a shorter lifespan, whereas a sump pump that is too small will underwork and have a shorter lifespan. You can also solve the issue of size by determining how much horsepower your sump pump requires. To appropriately deal with potential floods, you’ll need a 1/3 horsepower sump pump capable of pumping 35 gallons of water per minute. If your home is on a high water table, a 1/2 horsepower sump pump capable of pumping 60 gallons of water per minute is recommended.
Discharge Pipe Frozen or Clogged:
Flood water will pour back down the discharge pipe and all over your basement if your sump pump’s discharge pipe is frozen or clogged with debris. While it is impossible to prevent your discharge pipe from freezing, you can build a special discharge line that permits water to depart your basement even if your main discharge pipe is frozen solid. Make sure your discharge pipe’s opening is shielded with a grate to keep it from clogging. A protective cover will keep dirt and small animals out of your discharge pipe, preventing it from clogging.
Maintenance Defects:
Your sump pump may only require a good cleaning and some quarterly maintenance. Running a vinegar solution through your sump pump, ensuring sure your float is unrestricted, and cleaning all the vents on your sump pump and the air holes on your discharge line can all be done in a matter of minutes.
Getting Older:
Years of wear and tear finally cause your sump pump to fail after 7 to 10 years of service. Although some sump pumps can last much longer than this, it is suggested that you replace your sump pump after ten years to guarantee optimal safety and efficiency.
Installation Error:
While the two remaining probable failures are uncommon, you may want to look into them if none of the other options help you solve the problems your sump pump is having. It’s likely that your sump pump was placed wrongly at first, resulting in its current ineffectual status. Several things could have gone wrong during the original installation of your sump pump:
- On the discharge line, there was no check valve installed.
- In the discharge line, there is no air relief hole.
- Using Gravel or Dirt to Set Up Your Sump Pump
Defective Product:
It’s possible that your sump pump is malfunctioning, however it’s doubtful. It’s critical to test your sump pump as soon as possible after installation to ensure it’s in good working order.
We hope that by determining the causes of sump pump failure, you will be able to keep your basement dry and have some extra cash in your pocket.
Take advantage of the warmer summer months to have us look at your basement and help you determine how best to address your basement leakage problems.
Get the job done RIGHT – Hire a professional Waterproofing company!
Want to know more about our waterproofing process? Give us a call at 416-759-2995
Rely On our ACCL Wet Basement Waterproofing Experts
Don’t Drown in a wet basement!
Rely On Wet Basement Waterproofing Experts in Toronto
If you’ve noticed foundation cracks, spots, water, mold, and mildew, don’t ignore the signs or it could lead to more damage and possible health effects.
The basement waterproofing specialists at ACCL Waterproofing know how to repair your basement and foundation walls and keep moisture out of your basement. We would be pleased to develop a guaranteed solution to keep your basement dry!