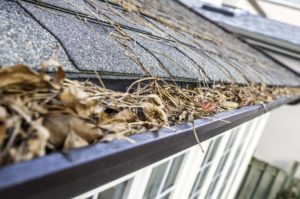
Keeping Downspouts and Gutters Clean – ACCL Waterproofing
Keeping Downspouts and Gutters Clean – ACCL Waterproofing
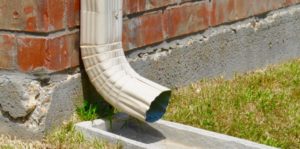
One of the many reasons to clean your gutters and downspouts is to avoid basement water damage. Water can build in basements due to clogged gutters and downspouts, which you may not be aware of.
PERSERVE THE SAFETY AND DRYNESS OF YOUR BASEMENT
Most people who are aware of this want to keep their basements dry by having their gutters and downspouts cleaned on a regular basis. There are several companies that do this form of cleaning, and these services are usually inexpensive. Cleaning your gutters a few times a year is an excellent method to protect your home’s investment.
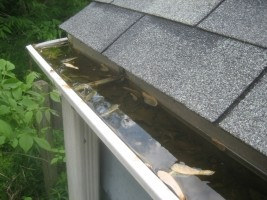
MORE ENDURING
Clean gutters and downspouts will last longer, in addition to preventing water from collecting in basements. The weight of their contents may pull the gutters away from where they are fastened if they are not cleaned. This could result in product damage or poor performance.
RISK OF COLDER WEATHER
If you live in colder climates, you are well aware of how bitterly cold winters can be. When your gutters aren’t cleaned, they might cause ice dams. This means that water flows over the sides of overflowing gutters and freezes. Water will eventually enter a home as a result of this.
VERMIN
Finally, rodents prefer to nest in blocked gutters, and you don’t need any more vermin in your property. Ants, mice, rats, and flying insects are among the critters that prefer clogged gutters.
Take advantage of the warmer summer months to have us look at your basement and help you determine how best to address your basement leakage problems.

Get the job done RIGHT – Hire a professional Waterproofing company!
Want to know more about our waterproofing process? Give us a call at 416-759-2995
Rely On our ACCL Wet Basement Waterproofing Experts
Don’t Drown in a wet basement!
Rely On Wet Basement Waterproofing Experts
If you’ve noticed foundation cracks, spots, water, mold, and mildew, don’t ignore the signs or it could lead to more damage and possible health effects.
The basement waterproofing specialists at ACCL Waterproofing know how to repair your basement and foundation walls and keep moisture out of your basement. We would be pleased to develop a guaranteed solution to keep your basement dry!
ACCL Waterproofing: Installing Drainage Systems!
How to Waterproof a Basement and Install a Basement Drainage System – The ACCL Way!
Is your basement constantly wet? Do April showers bring May flowers and a flooded basement? Then waterproofing your basement and installing a drain system with a sump pump may be necessary. A wet basement not only prohibits you from using extra space in your home, but it can also turn your basement into a large petri dish ideal for the growth of harmful molds and fungi.
10 STEPS!
ACCL Waterproofing Step One:
It’s impossible to avoid the fact that breaking up concrete is a filthy task. While you’re working, switch off your furnace or central air conditioning and block all return air vents until you’re finished. Move everything out of the area and drape plastic from the ceiling to create an isolated workstation instead of covering it with plastic.
If you have an unfinished ceiling, make sure the plastic reaches all of the joist spaces. While using the jackhammer, place a fan in the window to help with the heavy dust. Also, put on a dust mask and earplugs. More measures to secure your house during remodeling efforts can be found here.
ACCL Waterproofing Step Two:
Electric jackhammers are preferred by professionals since pneumatic jackhammers generate significantly more dust. To begin, hammer a line 16 to 18 inches away from the wall. Begin by chipping in a straight line along the length of the wall, then return to break it down into manageable chunks. Return once the perimeter has been completed to break the concrete row into manageable fragments. If each component has enough freedom to pull away, it will break free more easily, so remove the sections as you go. Remember to make a larger area for your sump basin!
ACCL Waterproofing Step Three:
Dig down to the bottom of the footing but not below it once the concrete has been removed. You could wind up with cracks in your wall or worse if you jeopardize the soil beneath the footing. Use rubber feed buckets (usually used for farm animals) since they fit through narrow basement windows and are less likely to damage trim.
ACCL Waterproofing Step Four:
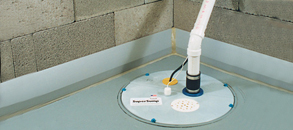
It’s ideal to put your basin in an unfinished basement area so you can get to the sump pump quickly. If you don’t intend to complete the basement, put the basin where you want the water to drain out of the house so you don’t have to install as much plastic tubing.
Dig the hole until the point where the top of the basin is flush with the finished concrete. Drill 1-inch holes in each block core and each mortar joint if your waterproofing basement walls are composed of concrete block. The water that collects in the cores and between the blocks will now be able to flow into the drain. Drill the holes as close as possible to the footings. It’s possible that the lower bricks are concrete-filled. You’ll have to demolish any existing walls and install foundation wrap in that instance. As you drill, place a shop vacuum hose close to the hole to reduce dust.
ACCL Waterproofing Step Five:
Place the basin in its final position before marking the locations of the holes where the pipes will meet the basin. Keep in mind that towards the basin, there will be a thin layer of rock (one layer thick) under the pipe. Use a reciprocating saw, jigsaw, or hole saw to make the holes. It is not necessary for the holes to be flawless. Don’t remove all of the dirt at once; some will be needed to fill in around the basin. Fill in around it once it’s permanently in place, tamping the ground with a 2×4 as you go.
ACCL Waterproofing Step Six:
Shovel in a bottom layer of 1-1/2-in. to 2-in. cleaned river rock before laying the pipe in the trench (a layer of smaller rock can become clogged with minerals and sediments). Every 10 feet, the pipe should slope at least 1/4 inch toward the basin. To get this pitch, rake the rock around. On top of the boulder, place your irrigation pipe. Because regular flexible drainpipe clogs easily, don’t use it. Schedule 10 perforated pipe with a 4-inch diameter is preferred.
Purchase a pipe with 1/2-inch rows. Only one side of the pipe has perforation holes, not all the way around. Install the pipe with the openings pointing down so that the minerals and sediment in the water can flow down and settle into the earth. The water that does rise up into the pipes from below will be reasonably clean as a result. Clean water will extend the life of the entire system by several years. Begin at the basin and push the male end of the pipe about 4 inches into the basin. At the corners, use PVC or ABS elbows. Cementing the parts together isn’t required.
ACCL Waterproofing Step Seven:
Drill a 1-inch hole in the core of each block and each mortar junction. After you’ve installed your pipe, you’ll need to connect it to the 1-inch irrigation hose that will bring the water from the blocks to the trench. Stick with irrigation hose because a softer hose, such as a garden hose, can be crushed flat by the new concrete. With a hacksaw or reciprocating saw, cut the hose. Make sure each hose portion is several inches past the footing.
ACCL Waterproofing Step Eight:
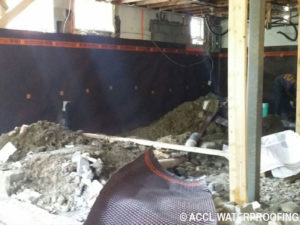
If your walls are made of poured concrete rather than block, you’ll need to build a foundation wrap to allow water to drain properly. The foundation wrap is constructed of durable plastic and has rows of dimples that allow water to pass through. With a utility knife, cut the sheets into strips. Allow the bottom half of the strips to run past the footing by bending them at 90 degrees. The length of the wrap against the wall is determined by your circumstances. Run the wrap up 4 in. above the top of the concrete on a poured wall, or up 4 in. past the holes you drilled in the block wall, at the very least. Try to tuck the wrap below the bottom plate if you’re working along stud walls.
ACCL Waterproofing Step Nine:
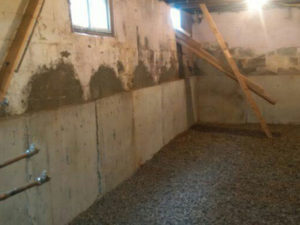
It’s time to cover it up after the hoses or foundation wrap are in place. Fill the trench with river rock up to the existing slab’s bottom, then cover the rock with a vapour barrier of at least a 6-mil thickness of plastic. Mix your concrete outside to reduce dust. For slabs and sidewalks, a bagged concrete mix will suffice. To “screed” the fresh concrete flush with the floor, slide a 3-foot strip of 2×4 along the floor and smooth it out with a hand float. After 20 minutes, use a finishing trowel to level it out. Fill the gap beneath any existing walls entirely with the float.
ACCL Waterproofing Step Ten:
Submersible pumps with a vertical float switch are more reliable than pedestal or float switch pumps, according to professionals. On the pump, install a 6- to 8-in. segment of pipe, followed by a check valve. Ensure that the check valve does not obstruct the pump switch. Attach another segment of pipe above the check valve, long enough to reach above the top of the basin. In the portion of pipe just below the check valve, drill a 1/4-in. to 3/8-in. vapour lock release hole.
This permits the pump to come up to speed before attempting to force open the check valve, which may be under pressure from many gallons of water. While the pump is running, angle the hole so that water pours down. It’s preferable if your pump has its own output. Other appliances connected to the same circuit may trip a breaker if extension cords go unplugged. The pipe exiting the basement must be placed in a sloped area away from the house.
Consider burying the waste pipe in the trench and having it come back up where you want it if it involves running a pipe back across the basement. If you reside in a cold environment and your pipe will discharge above ground, run it no more than 8 inches past the siding. In the winter, this will keep it from freezing. Basement drain water, with a few exceptions, cannot be put into city sewer systems.
Most systems can be emptied into storm sewers if they are above ground level. Inquire with your building official about the rules in your region.
Take advantage of the warmer summer months to have us look at your basement and help you determine how best to address your basement leakage problems.
Get the job done RIGHT – Hire a professional Waterproofing company!
Want to know more about our waterproofing process? Give us a call at 416-759-2995
Rely On our ACCL Wet Basement Waterproofing Experts
Don’t Drown in a wet basement!
Rely On Wet Basement Waterproofing Experts
If you’ve noticed foundation cracks, spots, water, mold, and mildew, don’t ignore the signs or it could lead to more damage and possible health effects.
The basement waterproofing specialists at ACCL Waterproofing know how to repair your basement and foundation walls and keep moisture out of your basement. We would be pleased to develop a guaranteed solution to keep your basement dry!
Waterproofing Additions: ACCL Waterproofing
What Causes Structural Foundation Damage in Home Additions?
You and your family adored your home, enjoyed the neighbourhood and despised the prospect of relocating. However, as your family grew, the house began to seem claustrophobic, so you decided to stay put and added an extension to the house, which included a couple of extra bedrooms and a family room.
Years later, your family is still happy in their home, but you’ve started to notice some strange things: The drywall in those newer bedrooms upstairs is cracked, the door from the family room to the back yard is difficult to open and close, and the floors in the addition have a significant slant toward an outer corner.
If your home’s original structure had been in place for several decades, any foundation sinking or movement would have occurred long before your addition was erected. Moreover, whether or not there was a basement or crawl space, the original foundation was most likely designed with spread footings and other construction techniques that helped maintain its stability.
New Addition: Pros more than Cons
The new addition expands the roof of the house, increasing the amount of water flowing from downspouts, which are normally located at the corners of the new addition. All of this water saturates the soil, which dries out and shrinks during droughts like the current one, forcing the addition’s outside corners to sink.
Your addition is shifting while the rest of the house remains stationary due to these and other building considerations. This explains the tilted or uneven floors, broken walls, and jammed doors and windows. When you notice these things, you know your foundation has been damaged.
Also, if it was a do-it-yourself or handyman-built addition, the foundation walls may not have been dug deep enough to withstand frost heave in cold conditions. Whatever the source, you’re dealing with a situation that need the assistance of a structural foundation repair contractor. Choose one that will use the most up-to-date techniques to raise and stabilise the foundation beneath your addition so that it is as functional as possible.
ACCL Waterproofing’s structural foundation damage professionals have years of experience rebuilding all types of foundations and maintaining their stability. We’re ready to return your home to its original level, swiftly and affordably, regardless of the sort of underpinning your foundation requires. Why not get a free quote?
Take advantage of the warmer summer months to have us look at your basement and help you determine how best to address your basement leakage problems.
Get the job done RIGHT – Hire a professional Waterproofing company!
Want to know more about our waterproofing process? Give us a call at 416-759-2995
Rely On our ACCL Wet Basement Waterproofing Experts
Don’t Drown in a wet basement!
Rely On Wet Basement Waterproofing Experts
If you’ve noticed foundation cracks, spots, water, mold, and mildew, don’t ignore the signs or it could lead to more damage and possible health effects.
The basement waterproofing specialists at ACCL Waterproofing know how to repair your basement and foundation walls and keep moisture out of your basement. We would be pleased to develop a guaranteed solution to keep your basement dry!
Underpinning – ACCL Waterproofing
ACCL Waterproofing: Underpinning Basements
The basement is the first place you should examine if you want to make your home more habitable. But what if your basement is unfinished or has to be lowered to make your family more comfortable? This is where the procedure of basement lowering, also known as underpinning, comes in handy for increasing the amount of living space in your basement.
Waterproofing firms dig down to your house’s footing and increase the height of your ceilings while strengthening the base of your foundation walls in this form of basement foundation repair.
The basement was never meant to be a living space in many older homes, with low ceilings and exposed ducting limiting the amount of headroom. The number of materials necessary for basement lowering makes it no easy task. However, it will significantly raise the value of your home while also increasing your living space.
Why should you underpin your basement??
- Basement lowering, also known as underpinning, includes digging several feet down into the basement floor. This will increase the value of your property by ensuring that the basement is conveniently accessible and usable. Furthermore, underpinning improves the structural integrity of your property, thereby improving its appearance. These basements are typically 6 feet high, thus reducing the basement by 2 feet for a total of 8 feet for headroom is the goal.
The terminology used when discussing basement lowering-
- Benching: The benching system is utilized to add to the amount of living space available. The benching system is similar to the underlying system in that it allows you to achieve the same overall height gain while using less space. If the area is finished according to the benching system, it can be used for a variety of purposes. It is a system that is less expensive and takes half the time as underpinning.
- Underpinning: The primary purpose of the system is to add additional living space. You will be able to raise the total height and square footage of your basement with this technique. The majority of homeowners select this choice since it allows them to either rent out their basement as a rental property, generating cash, or obtain a fully finished basement, increasing their living space.
Lowering your basement is a great method to give your home a complete facelift. However, it is a major project that will have an impact on the general construction of your home, and you must complete it correctly. Make sure the company you hire has underpinning and liability insurance before you take any chances or cut corners.
Take advantage of the warmer summer months to have us look at your basement and help you determine how best to address your basement leakage problems.
Get the job done RIGHT – Hire a professional Waterproofing company!
Want to know more about our waterproofing process? Give us a call at 416-759-2995
Rely On our ACCL Wet Basement Waterproofing Experts
Don’t Drown in a wet basement!
Rely On Wet Basement Waterproofing Experts
If you’ve noticed foundation cracks, spots, water, mold, and mildew, don’t ignore the signs or it could lead to more damage and possible health effects.
The basement waterproofing specialists at ACCL Waterproofing know how to repair your basement and foundation walls and keep moisture out of your basement. We would be pleased to develop a guaranteed solution to keep your basement dry!
What to Do If Your Window Well Is Filling Up With Water: ACCL Waterproofing
What to Do If Your Window Well Is Filling Up With Water
It’s wonderful to have windows in the basement. They let in natural light, can be opened to let in some much-needed fresh air, and can be used as an emergency exit when correctly configured. Of course, unless the homeowner prefers a close-up view of dirt, there must be window wells outside when there are windows in the basement. A window well allows for plenty of light and air while also acting as a stiff barrier to keep soil out.
A basement window, on the other hand, creates another gap in a foundation wall through which water can enter the basement. A well installed and maintained window will keep minor seepage out of the basement and is an important aspect of keeping it dry.
A considerable impact is also played by the window well. A window well, for all its charms, is nothing more than a large aperture in the ground adjacent to a foundation that, like any other large opening in the ground, has the potential to fill with water after a strong or prolonged rain or snow melt.
When a window well fills with water, it puts the basement window to the test by putting pressure on it and retaining water that seeks out any small opening to relieve the pressure by entering the basement space.
So, what’s the best technique to repair a water-filled window well?
How to Repair a Water-Filling Window Well
The drain and the lid are the two components of the window well system that must be repaired (or prevented) if the window well fills with water.
Window Well Drain
Every window well should have a drain to allow water to depart the well and not build up to the point where it causes a seepage problem in the basement. Drains can be connected to drain tile on the inside or outside, or they can be run to daylight if there is an appropriate slope.
A window well should never fill with water if the drain is properly installed and maintained. Of course, some home builders will skip the drains and install window wells without them. However, more often than not, the drains are present but clogged due to a lack of maintenance.
Finding and unclogging the drain is one approach to fix a window well that is filling with water. Cleaning material from the drain’s opening is normally simple, but unclogging a drain that has grown clogged below the surface can be tough. Of course, the ideal approach to deal with a clogged window well drain is to avoid it in the first place by installing a good window well cover.
Window Well Covers
The most significant function of a window well cover is to keep out the debris that can block the drain, such as leaves, grass clippings, and trash. Many people make the understandable error of thinking that fragile plastic “bubble” coverings from the hardware store will keep water out.
A steel grid cover is better, but it still allows a lot of debris to pass through.
The ideal window well cover will be made of reinforced polycarbonate and custom-fitted to the window well so that it completely covers it. While this style of cover will prevent most water from entering, it will also keep out debris (and small animals) and keep the window well drain open and operational.
These window well covers, of course, aren’t available at your local big box shop; instead, the homeowner will require the help of a basement waterproofing expert who has experience fabricating and installing polycarbonate coverings.
Take advantage of the warmer summer months to have us look at your basement and help you determine how best to address your basement leakage problems.
![]()
Get the job done RIGHT – Hire a professional Waterproofing company!
Want to know more about our waterproofing process? Give us a call at 416-759-2995
Rely On our ACCL Wet Basement Waterproofing Experts
Don’t Drown in a wet basement!
Rely On Wet Basement Waterproofing Experts
If you’ve noticed foundation cracks, spots, water, mold, and mildew, don’t ignore the signs or it could lead to more damage and possible health effects.
The basement waterproofing specialists at ACCL Waterproofing know how to repair your basement and foundation walls and keep moisture out of your basement. We would be pleased to develop a guaranteed solution to keep your basement dry!
There are eight reasons why sump pumps fail – ACCL Waterproofing
Sump Pump Failures
A sump pump, like a first aid box, a fire extinguisher, or your home’s security system, is rarely used, but it can be an invaluable tool in an emergency. Sump pumps aid in the mitigation and prevention of such disasters by immediately emptying flood water from a home’s basement through an external output pipe. And, like most emergency equipment, it’s critical to keep your sump pump in good working order and free of mechanical issues. If you don’t, you could end up with a flooded basement and thousands of dollars in damage. We hope that by identifying the eight causes of sump pump failure when it is most required, you will be able to avoid these possible issues.
Power Outage:
Storms and power outages frequently coincide to create a lethal combination that results in flooded basements around the country. This is owing to the fact that big rainstorms result in excess water, and a power outage renders your sump pump incapable of draining water. Fortunately, you may avoid this problem by purchasing and installing a backup generator for your sump pump. If you lose power during a storm, you can manually turn on this generator to prevent flooding in your basement.
Faulty Switches:
A jammed switch is the most typical mechanical issue that leads to sump pump failure. The float that activates the switch becomes ineffective when the pump shifts inside the basin, forcing it to lodge against the side of the pump, rendering it ineffective. It’s also possible that debris will clog the float, rendering it ineffective. Both of these issues may usually be resolved with some cleaning and repositioning of your sump pump within the basin.
Pump is Overworked:
If your sump pump isn’t the proper size or can’t handle the appropriate horsepower, it can easily be overwhelmed by a flow of water. A sump pump that is too large will overwork and have a shorter lifespan, whereas a sump pump that is too small will underwork and have a shorter lifespan. You can also solve the issue of size by determining how much horsepower your sump pump requires. To appropriately deal with potential floods, you’ll need a 1/3 horsepower sump pump capable of pumping 35 gallons of water per minute. If your home is on a high water table, a 1/2 horsepower sump pump capable of pumping 60 gallons of water per minute is recommended.
Discharge Pipe Frozen or Clogged:
Flood water will pour back down the discharge pipe and all over your basement if your sump pump’s discharge pipe is frozen or clogged with debris. While it is impossible to prevent your discharge pipe from freezing, you can build a special discharge line that permits water to depart your basement even if your main discharge pipe is frozen solid. Make sure your discharge pipe’s opening is shielded with a grate to keep it from clogging. A protective cover will keep dirt and small animals out of your discharge pipe, preventing it from clogging.
Maintenance Defects:
Your sump pump may only require a good cleaning and some quarterly maintenance. Running a vinegar solution through your sump pump, ensuring sure your float is unrestricted, and cleaning all the vents on your sump pump and the air holes on your discharge line can all be done in a matter of minutes.
Getting Older:
Years of wear and tear finally cause your sump pump to fail after 7 to 10 years of service. Although some sump pumps can last much longer than this, it is suggested that you replace your sump pump after ten years to guarantee optimal safety and efficiency.
Installation Error:
While the two remaining probable failures are uncommon, you may want to look into them if none of the other options help you solve the problems your sump pump is having. It’s likely that your sump pump was placed wrongly at first, resulting in its current ineffectual status. Several things could have gone wrong during the original installation of your sump pump:
- On the discharge line, there was no check valve installed.
- In the discharge line, there is no air relief hole.
- Using Gravel or Dirt to Set Up Your Sump Pump
Defective Product:
It’s possible that your sump pump is malfunctioning, however it’s doubtful. It’s critical to test your sump pump as soon as possible after installation to ensure it’s in good working order.
We hope that by determining the causes of sump pump failure, you will be able to keep your basement dry and have some extra cash in your pocket.
Take advantage of the warmer summer months to have us look at your basement and help you determine how best to address your basement leakage problems.
Get the job done RIGHT – Hire a professional Waterproofing company!
Want to know more about our waterproofing process? Give us a call at 416-759-2995
Rely On our ACCL Wet Basement Waterproofing Experts
Don’t Drown in a wet basement!
Rely On Wet Basement Waterproofing Experts in Toronto
If you’ve noticed foundation cracks, spots, water, mold, and mildew, don’t ignore the signs or it could lead to more damage and possible health effects.
The basement waterproofing specialists at ACCL Waterproofing know how to repair your basement and foundation walls and keep moisture out of your basement. We would be pleased to develop a guaranteed solution to keep your basement dry!